2018-07-02

PR Weekend

I was very excited to get the chance to attend the 2018 Patternreview Weekend in Stratford at the beginning of last month. It was the first time I'd made it to a PR Weekend in several years. I spent part of the day before in Toronto—I could’ve gone fabric shopping, but mostly I stayed in Chinatown instead—and ended up in Stratford that evening (there are two trains a day, and it would've been impossible to connect to the morning one).

In the milling around before going to the Stratford costume warehouse Friday morning, unfortunately I missed heading over to Knox Church and seeing the demos that were happening there. But I did get to meet some people who ended up being on the other bus the next day for fabric shopping, or at other tables Friday night, so that was worthwhile. The costume warehouse was a lot of fun to look at, and then there were two talks on the Friday evening, before a catered dinner.

One talk was by Gillian Whitcombe on taking better pictures. That was very positive, fun and informative. For me to follow her suggestions as they relate to Patternreview, the next step would be to get some kind of extra hardware so I can remotely control a camera, because the whole timer-and-run thing is a drag. The main problem right now is I’ve found my camera, but I put all its chargers and extra batteries *somewhere* when unpacking after the move, so it’s dead until I find them. I’d rather buy a remote for the camera than my phone, I think, since iThings are typically overpriced. But I’ll look into it more.

The second was a demo by the owners of Jalie of some of their patterns, especially their ingenious new V-neck top called "Bobbie." It has a facing acting as a sort of under-vest to keep the V neck close to the body even if you bend over. I think they'd sold out of the ones they brought, but I may buy it later.

I’d show pictures of other attendees but that doesn’t sit well with me to put on this blog, so I’ll leave it to the official PR blog post. Instead, here’s some fabric. The wonderful lace at right I won in a giveaway for entering the most items into contests of anyone at the event… hmm, now I feel like I should finally get around to volunteering to manage one. I'm guessing this happened because I entered lots of things into a couple of stash contests over the years.


I also somehow had posted the most comments on other people’s reviews, so won another of the giveaways for that. Maybe that happened because I have been on for so many years and I used to post on many of the new reviews every day? I was surprised by that but was happy to pick out this grading DVD. I’m very curious to see what grading specs/methods Kathleen Cheetham uses; I know of the Threads article and some of the sizing standards, and I often sew single-size vintage patterns that need to be graded up or down. But I don't know what she does for her Petite Plus sizes.


In addition, I got too much lingerie fabric/lace from Bramakers’ Supply in Hamilton. They have several of the same types of stretch laces and embroideries that can be found in Europe from stores like Sewy or Kantjeboord, I think because they actually go and buy some from time to time. This is nice to have in the beige and molded-foam-cup desert North America has sometimes seemed to be until recently. As well, and very importantly, they stock fabrics and notions made to match, so that you can make bras with perfectly matching elastics, closures, and channeling in a variety of colours, around 14 or so last I checked.

The rest of the large pieces of fabric were from the shopping trip on Saturday and they’re mostly meant to be used to replace various parts of my summer wardrobe. We’ll see how fast it actually gets sewn up. I’d hoped to get some nice cotton shirtings, and was able to find a couple. I also spied out a lovely handkerchief linen and a raw silk in Ann’s Fabrics in Hamilton. And there’s also a cotton canvas print that I’ve already made up into a skirt, which I’ll review one of these days.

Here’s hoping there are more PR Weekends in Canada soon.

2018-05-29

Those shoulder holes

You know the ones. Some variants are classic(al) in a literal sense, but many are on the faddish and contrived side IMO. Regardless, they're still being promoted by several pattern companies, both American and European. I don't think I saw the style at all in Germany as late as 2014. It didn’t seem all that popular in Vancouver either, while I was there, but I’ve seen more of it in Kingston—which has hotter summers and probably more tourists around where I'd see them—in 2017–18.

They have some potential benefits:
  • less uneven tanning if you often wear short sleeves but rarely go sleeveless
  • can feel warmer, if it’s your forearms and not your shoulders that get cold
  • unlike with cap or no sleeves, nobody needs to know the state of your armpits, if that’s a controversial issue in your area (lol)
  • likewise, you don’t have to show much of your upper (or lower) arms if you don’t want to
  • might feel less sweaty and gross than sleeveless in humid weather, IMO, and if you chose to add dress shields, they’d be more effective, as they could cover both sides
  • even long-sleeved versions can look summery, if you’re in a climate where this might be useful
Downsides:
  • not necessarily considered appropriate for all occasions (such as in the office)
  • structurally trickier than sleeves without the holes, since they aren’t supported by the shoulders
  • more edges to finish
  • when they do go out of fashion again, it'll be with a thud
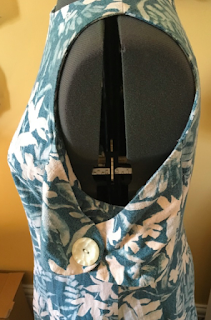
I made a couple of dresses in this style last year, so I’ve been glad to see I’m not the only one still wearing it. One was based on a morph between the recent McCall’s 7412 and an early 70s Simplicity, cut as long as my fabric would allow, with the neckline hiked up and mock-smocking added to the sleeves and raised waist.

This is a crinkled linen blend I got from the Gala Fabrics that used to be in Vancouver. It lettuced a bit at the neckline and hems, but that and the clinging effect seem to become less noticeable once it's worn for a while and the fabric relaxes somewhat. The mock-smocking was done with elastic thread in the bobbin, while the neckline is held in with cord elastic in a casing.

The other was a modification of an early 2000s Neue Mode, which I may go back and use in unmodified form one of these days. The waist turned out rather loose (in keeping with the drawings) but that isn't such a bad thing, in hot weather.


The sleeves are self-lined and have an overlapped, mock-buttoned effect. I used the sleeveless views' combined neck and armhole facing to sandwich the partial armscye seams. The buttons were a gift and the fabric is a (Telio?) linen blend print that came from Dressew.

2017-05-01

Closet control by "seasons"

There's no shortage of writing about wardrobe planning, cleaning out one's closet, blah blah blah. It's a first-world problem and not exactly earth-shattering – unless we consider the literal sense and go into all the environmental problems of fashion – but this is how I currently manage my closet space.

I have four groups of clothing items ("seasons") that I switch in and out of use at certain times of year – I find the solstices and equinoxes easy to remember. Two of these groups are in use, and in the more accessible part of my closet space, at any given time. At the moment, that's spring and summer; it'll be summer and fall next. This was part of winter and spring, shuffled together a bit:


Each of these groups is allowed to contain up to a certain number of pieces. I'm a little more lax with this when the group is actually in use, but by the time it goes out of rotation it has to be no more than 24. That total fits okay in my closets. I also have a couple of small, completely unrelated sections for activewear, outerwear, and special occasions; they don't have to follow these rules and are kept out of the way of the everyday items.

I'm trying to keep the colour schemes of all four groups roughly compatible, more or less fitting into what certain colour analysts might call Soft Summer or Dark Winter, but this is very much a work in progress: I have older items that don't match and still aren't quite worn out or dispensable enough to get rid of just yet. The bright pink spring dress above was an example, although it's on its way out because I've had it with the poor quality of the fabric.

Each group has a slightly more specific colour scheme within the range. Spring has my clearer pastels and silver grey, summer is a little hazier and more faded while still having highish contrast, fall is warmest, and winter is smoky and darkest. Each group is meant to try to cooperate with the neighbouring seasons, since items from both of the groups in rotation at any given time should ideally be able to work together. On the other hand, for example, the spring plums don't have to get along with the fall browns, since they're never in rotation together.

At present I'd say I'm happiest with what I have for winter, least happy with summer (a lot of the colours I've got there aren't right at all), and spring has a fairly dire shortage of pants, which means I have to rely on the winter or summer ones. I have two or three projects in the works to remedy that.

This scheme works okay in a fairly monotonous climate. More extreme temperatures might require a silly number of layering pieces to make it work. But it gives me a fresh look at what I already have, every time I switch a new group in.

2017-03-06

DIY hook-and-loop cable wraps

I used to use twist ties to bundle my cords, until I got a cat who has an unhealthy obsession with them. Zip ties are another option, but you'd better be pretty sure of where you want them. Strips of hook-and-loop tape are a nice alternative, and require no tools to remove if it turns out you didn't put them in the right place the first time.

You can get big packs or rolls of the ready-made ones (Velcro or Panduit brands, for example) for a price that usually isn't very beatable compared to retail hook-and-loop tape. But the color selection readily available around here, or online and selling to Canada, seems to be mostly limited to black. That's fine for some of my cords, but there are others where I'd rather have something close to ivory or beige, to match the cord and draw less attention to it.

Well, Dressew had a sale bin of packs of 1yd loop and 1/2yd hook tape for 25 cents. They had white and pastels only, because these were evidently marketed for babies, and there aren't many goth babies, I guess. For my purposes, I found I could get 8 reasonably-sized wraps from a pack. This actually is a good deal compared to the ready-mades. They do happen to be wider than necessary, but at that price it doesn't bother me.


You just cut a piece of hook, a piece of loop, overlap them a bit (let's say 3/8-1/2") with wrong sides together, sew (I settled on a three-step zigzag), and you're done. It's best to place the loop side against the feed dogs, because otherwise the thread may catch on the hook side as the needle comes up, and that makes a mess.

The "sticking" area of these may be less than it is with some of the ready-made ones, but I find it's more than enough. They also aren't quite as flat as the ready-mades, obviously, since there are the two pieces being overlapped, but I suppose they could be butted together against some kind of softer backing material if that's a concern. Personally, I didn't care enough to bother.

These will make my light-colored cords much less of an eyesore. I'll probably still buy ready-made wraps for the rest.

2017-02-14

Tea towels, for actual tea


I've again become sidetracked with knitting; this time it's to replace my sorry old kitchen towels. In ready-mades I was looking for something really specific, so unsurprisingly, it doesn't seem to exist: medium to dark colours; busy patterns without too much white in them; and thick fabric—the last seems pretty hard to find these days, at any price. One of my main uses for these is mopping up tea or colorful ingredients, but a lot of what I could find was thin, solid-coloured pastels that would get very noticeably stained on first use. I guess you could bleach them, but then you never quite know what color might result.

Well, two balls of Bernat Handicrafter will make a decent-sized towel for less than $3, when it's on sale. I got many different colors in an attempt to tie together all the miscellaneous colors in my kitchen; if I don't make myself thoroughly sick of this I could end up with 12 towels, which should pretty well replace what I've got. Here's one in Indigo and Lime Stripes.

It's a Purl Soho pattern that I downscaled, in both senses; you're meant to use Euroflax linen, which is lovely, but will make a thinner towel at a significantly higher price. It seems to me that linen yarn is less absorbent, somehow, too—is it the smoother surface, or just the fact that it's never spun as thick? Most importantly, they'd take a lot longer to knit as intended. Maybe someday.

2017-02-05

Cat tunnel

The idea here was to copy this ready-made cat tunnel, but in a sturdier fabric and colors that match the room better.


The original tunnel is a tube about 33" in circumference and 27 1/2" in length. I cut a rectangle of my base fabric for this size plus seam allowances, then pinned it around the existing tunnel and chalk-marked the placement of the wire casing that spirals around.

It got a little more complicated when I decided to add leaf appliques. At first I was thinking of doing catnip leaves, until I looked up what those are shaped like... nope, way too many little serrations. I decided on matatabi/silver vine instead—a simple heart-ish shape is a decent approximation, and my iridescent fabric at least hints at the silvery leaves. (Well, I gather that it really should be cross-dyed green and white, not green and purple, but when I get to tell fabric manufacturers what colors they should make, that'll be the day.)

I drew a template and cut out 20 of those, made up a placement, and satin-stitched on all the ones that could be attached with the base fabric still flat. For that I used some variegated green-and-white thread that was just sitting around being useless in my stash. Then I sewed up the tube (using a French seam, like the original) and finally added the last few leaves that needed to go over that seam. 


For the spiral wire casing I used a bias strip of the contrast fabric, and for the end casings I used strips of the base fabric on the straight grain. There are also three tubing ties made of the contrast fabric around one edge, so the tunnel can be collapsed and tied flat, and another piece of tubing on the opposite end that holds a jingly bell toy (on the original tunnel it's a piece of red braid). Those are each caught into the end wire casings.


Lastly, the tunnel needs a wire inserted into the spiral and end casings. I had a hard time getting a good springy wire; the best I was able to find was 14 gauge galvanized wire that doesn't have enough bounce to keep the tunnel straight. I'm guessing what I need might be spring steel, but given the size of the rolls I'm finding, plus the fact that I don't know for sure it is what I want, it might end up being cheaper just to buy more of these cat tunnel(s) to take their wires. (I'd thought I might have to cannibalize the original tunnel for its wire connectors anyway, but I'm hesitating to do that now that I've mended it—it doesn't have those falling-off casings and sticking-out wires anymore.)


Anyway, the new tunnel has been getting some cat approval even in its current sad-sack state, so I might leave both tunnels alone for the time being.

2017-01-26

First FO of 2017

This had been a UFO for a couple reasons, but the main one was it got sidelined for a sewalong I was doing with a local sewing meetup, working on a different project—that Burda 7237 coat. That was last fall, and this is not a winter top.


I used a linen remnant with a lot of sheen. (Yeah, it's very wrinkled, and I could've done more about that, but... it's going right back in the closet for another few months. It didn't get much beyond the necessary construction pressing.)

The pattern was Simplicity 3860, dated 1952, in vintage juniors' and misses' sizes 11-16 and 18. The one I have is about 3 sizes too small. After some dithering, I found it easier to try to duplicate all the details onto my fitting shell than to try to grade it. So what I'll say next has to be taken with a grain of salt, because I don't know the exact grade rules they followed and how well my version would correspond.

The impression I get is that this pattern (as drafted) will fit best on a figure that's relatively shallow front to back, i.e. with a wide, flat ribcage and chest: The armhole doesn't have much depth front to back, so on a person who has more, it will probably crease against the front of the arm/shoulder area, unless it's cut very low to mitigate this. Personally, I drastically reshaped the armhole when resizing the pattern and even so, had to hollow out the front more after cutting. The blouse also has the typical postwar very fitted waist that's more concave in front than I've ever been, so I had to reshape those darts. I narrowed the upper back, at the same time coping with an ostensibly permanent wear/crease line in my fabric that I couldn't cut around, by adding a long CB dart. I would probably cut and sew that as a seam next time, if there is a next time.


Lastly, design changes: I was a bit bored with the thing, so I decided to make reversed armhole facings to go with the neckband. I used an invisible zipper since that's what I could immediately find to match. (Now that I look at the button in artificial light, I'm really rethinking whether it's an okay match. Hmm. That might get changed.)

The pattern as a whole is clearly "of its time," and there are some aspects of the fit and design that probably really would work best for a 1950s teenager. But I think the blouse at least can be made much more versatile.